|
|
This is a versatile Arduino shield kit, which could be used in a variety of ways, for example: - QRSS/WSPR Transmitter |

KIT HAS BEEN DISCOUNTINUED!
Note regarding software
Assembly instructions
Kit photographs
Example sketches
FT301 external VFO by Lex PH2LB
Multiband WSPR Rx/Tx by Gwyn G3ZIL
This kit is an Arduino shield kit only (additional items are shown in some of the photographs, to illustrate possible applications). The kit contains PCB, Arduino headers for connection to an Arduino Uno, Reset button, 4-way headers for plugging in an LPF module, two 10-way headers for plugging in a frequency synthesiser module, necessary components for a QRP power amplifier (around 1/4 Watt on 30m band; varies depending on band), and BNC connector for RF output.
An Arduino board and additional plug-in modules should be purchased as required for your intended application. It is compatible with the QRP Labs LPF kit, QRP Labs Si5351A module kit, QRP Labs OCXO/Si5351A module kit, and QRP Labs relay-switched LPF kit. It can also be used with the QLG1 GPS receiver module kit (or others), and popular AD9850 DDS modules.
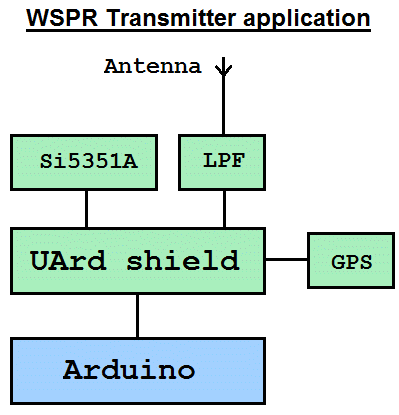
This diagram (RIGHT) shows a typical application, a QRP WSPR transmitter. All green-shaded modules are QRP Labs kits. In this example, the "Ultimate Arduino shield" is plugged onto the Arduino Uno. Si5351A Synthesiser module and LPF kits are plugged into the Arduino shield. A GPS receiver module such as the QLG1 is connected to provide precise timing, and location information for WSPR.
Note regarding software
This Arduino shield kit is intended for constructors who wish to experiment with writing their own code to control QRP Labs kits and modules. QRP Labs does not provide any complete working sketch for any particular project requirement. Some example Arduino sketches are provided below. Many of these have been submitted by constructors. If you have written a sketch for Arduino then please email us with details, and it can be added to this page!
People requiring a complete ready-made solution for WSPR or other modes should consider purchasing the Ultimate3S kit instead.
Assembly instructions
CLICK HERE to download the assembly instructions for the kit. Note that this Adruino shield kit PCB is slightly larger than a standard Arduino Uno PCB. The reason for this, is to provide space to optionally accomodate the Relay-switched LPF kit if required.
CLICK HERE for French Translation of the assembly instructions, by Gilles F1BFU - many thanks Gilles!
Kit photographs
The photographs below (click for larger size gallery) show:
Left: top row, left to right: LPF kit, OCXO/Si5351A kit, Si5351A Synth kit, AD9850 DDS module.
Middle: Arduino shield kit bag as delivered
Right: Kit contents (note, FT37-43 toroid is included in the kit but missing in the photo!)
The following photographs show an Arduino Uno, the Arduino shield kit, 30m LPF kit, and the three different synthesiser kits plugged in: from left to right: Si5351A Synth kit, AD9850 DDS module, OCXO/Si5351A Synth kit.
Example sketches
CLICK HERE for Demo CW/QRSS/DFCW/FSKCW beacon transmitter sketch, designed to be used with an Si5351A module (standard Synth kit or OCXO version) and LPF kit appropriate to the band being used. This sketch is really a combination of the example Si5351A sketch and the QRSS/DFCW/FSKCW sample sketch for the old Arduino shield kit. Everything for this example is in a single sketch file.
FT301 external VFO by Lex PH2LB
Lex PH2LB has used the Arduino Shield as a playground to develop a external VFO for my old FT301 (so he can work split). It's uses a AD9850 because he needs a (almost clean) sinewave output. It's work in progress but info, pictures, video's and the sketch are available at http://www.ph2lb.nl/blog/index.php?page=ft301-dds-vfo.
Multiband WSPR Rx/Tx by Gwyn G3ZIL
Gwyn G3ZIL provided this example (see sketch below) of a QRP Labs Arduino shield at the heart of a multiband WSPR Tx/Rx.
Description by Gwyn G3ZIL
This short description is of a project in progress. It combines QRP Labs boards with my own, and combines code made available on the QRP Labs group (thanks to Chris, OE1CGS) with my own. See Chris OE1CGS sketch here.
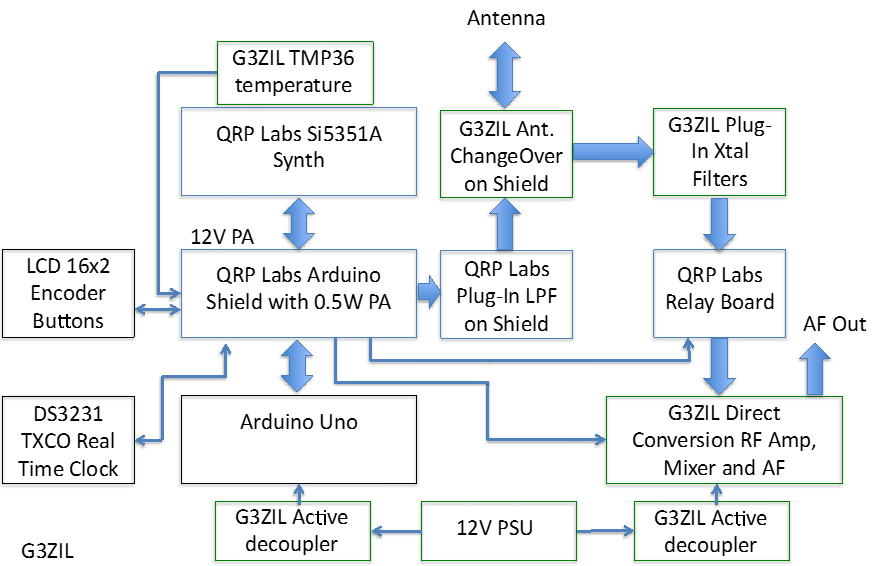
The block diagram is shown below. The QRP Labs Arduino Shield hosts the QRP Labs Si5351A synth. The Shield's prototype area is used for the contrast control for the LCD and the 5V antenna change over relay. The PA on the Shield is configured to use two BS170 and runs from the 12V supply to give ~0.5W output. Also on the Shield are the two 4-way headers for QRP Labs LPF boards. For now, transmitter band change involves a manual LPF board change. A tiny G3ZIL board with a TMP36 temperature sensor and its vital supply and output decoupling capacitors holds the TMP36 in contact with the Si5351A chip.
Connected to the QRP Labs Arduino Shield digital lines are a 16x2 LCD display, two button switches, an encoder and, via the I2C bus, a DS3231 TXCO real time clock. CLK0 from the QRP Labs Si5351A synth is used for the WSPR transmissions and CLK1 provides the local oscillator for the G3ZIL direct conversion receiver board. The front-end selectivity for the receiver is provided by G3ZIL plug-in crystal filter boards that fit into a QRP Labs Relay board controlled via the Shield. Front panel selection of one of five bands is possible, and others by manual exchange of filters. To minimise noise affecting the receiver, the digital and analogue parts are powered by separate active decouplers.
Software
I've used the standard Arduino IDE to write the software. The functions to control the QRP Labs Si5351A synth are essentially those that Chris, OE1CGS, has contributed to the QRP Labs Group; the only minor changes being to enable the use of both CLK0 and CLK1 via separate multisynths. I'm very much an amateur as regards software, so I'm sure the sketch I share for the entire transmitter-receiver could be greatly improved, but it does work. It has been great fun to "mash-up" the QRP Labs boards with my own, and I acknowledge the kindness of others from the QRP Labs Group in sharing their sketches.
Click here to download Gwyn G3ZIL sketch
A nice Lego case by Mario IK2CMN
Mario has an interesting solution to the problem of enclosing the Arduino shield kit and QLG1 GPS kit! See photos below!


